Visual explainability on Fundus Images with few-shot-learning
In this post, we will be covering the challenges on implementing GradCAM to adquire visual explainability on FSL models.
When training Machine Learning models for computer vision, it is really important to make sure your model is having a state-of-the-art performance, and the visual features taken into account when classifying the image is accurate. In order to do that, there are many possible tools that can help assessing the model quality, like GradCAM.
GradCAM
We are not spending too much time talking about how GradCAM actually works, that technical part can be found in online forums and the official paper, quoted above. What actually matters to us now is how is this tool actually helpful.
Basically, GradCAM is responsible for generating a visual heatmap, that can be plotted on top of the original image after passing through a ML model, and the “hotter” spots on the image, i.e., the spots marked with reddish colors, reflect the most considered neural network activations in order to perform the classification. For instance, if we have a dog picture, we want the red to be on top of the dog’s head, because that is the most important part of the image in order to classify a dog. If we get the reddish parts to be on the background, for example, than we know that our model is not “looking” at the right place to classify the image as a dog.
Taking one step further, this technique application goes to a lot of areas, including medical images, such as the ones we are working with. If we have, for instance, an image representing the hemorrhage category on retinal images, we expect to see the most network activations on top of that area.
Challenges
For this project, we are adapting a lot of things from our colleague’s paper, who performed Few-Shot Learning techniques, specially the reptile algorithm. For that, he developed a technique to apply GradCAM, performing Meta-Learning testing, in which he fine-tunes his FSL model with the target-class, on the image he wishes to apply GradCAM. This process is repeated until, on 100 training processes, the model correctly classifies the image wanted.
Our challenge now was replicating this into our Few-Shot models. There is a catch, though, because Reptile is an optimization FSL method, based on a different training algorithm, and not a custom neural network, such as our other models. That way, it was really difficult to just use the same code, and most parts of it needed adjustment. The biggest adjustment was given due to the fact that, the forward pass on the network classes were given like:
1
def forward(self,  train_imgs, train_labels, query_imgs):
With that, we could not just run the current image through the model and get its classification, the way our colleague was doing before. As a matter of fact, we needed train_imgs and train_labels to run through the model as well and generate the classification. Following this, we can check the code used inside the training process to adjust the algorithm for this problem:
1
2
3
4
5
6
7
8
9
10
11
12
13
14
15
16
17
18
19
20
21
22
23
24
25
26
27
28
29
30
31
32
33
34
35
36
37
38
39
40
41
42
#Load model
model = load_model(model_name, backbone_name).to(device)

if model_path is not None:
    checkpoint = torch.load(model_path, weights_only=False)['model_state_dict']
    model.load_state_dict(checkpoint, strict=False)

model.train()

#Train model
train_loader, query_loader, class_names = manager.get_fewshot_task(train=False)

support_images, support_labels = next(iter(train_loader))
query_images, query_labels = next(iter(query_loader))

support_images = support_images.to(device)
support_labels = support_labels.to(device)
query_images = query_images.to(device)
query_labels = query_labels.to(device)

query_labels_indices = query_labels.argmax(1)

criterion = torch.nn.CrossEntropyLoss()
opt = torch.optim.Adam(model.parameters(), lr=0.0001)

for epoch in range(epochs):
    if augment == "cutmix" or augment == "mixup":
        support_images, support_labels, query_images, query_labels_indices = \
        get_augmented_images_and_labels(aug,
                                        support_images,
                                        support_labels,
                                        query_images,
                                        query_labels_indices)

    opt.zero_grad()

    scores = (support_images, support_labels, query_images)

    loss = criterion(scores, query_labels_indices)
    loss.backward()

    opt.step()
On this code, we separate images into support_images and query_images, and use that to train the model with PyTorch. But it was not enough, because we generate the GradCAM using the the Advanced AI explainability for PyTorch library. In order to generate the GradCAM, we need to input our model on the GradCAM class constructor, and the model is expected to run an image by using model(image). In order to fix this problem, Gemini tool proposed we use a model wrapper that is built with the same constructor as the inputs needed for the forward() method, but only takes the input image on its forward step. That can be seen on the code:
1
2
3
4
5
6
7
8
9
class CustomModelWrapper(nn.Module):
    def __init__(self, few_shot_model, support_imgs, support_labels):
        super().__init__()
        self.few_shot_model = few_shot_model
        self.support_imgs = support_imgs
        self.support_labels = support_labels

    def forward(self, x):
        return self.few_shot_model.forward(self.support_imgs, self.support_labels, x)
That way, we can actually now send our wrapped model to the GradCAM constructor and see everything working:
1
2
3
4
5
6
7
8
9
10
11
12
13
14
15
16
17
18
model.eval()
wrapped_model = CustomModelWrapper(model, support_images, support_labels)

pred = int(torch.argmax(wrapped_model(image)))

if class_names[pred] == target_class:
    if backbone_name == 'resnet50.a3_in1k':
        target_layers = [model.backbone.layer4[-1]]
        cam = GradCAM(model=wrapped_model, target_layers=target_layers)
    elif backbone_name == 'swin_s3_tiny_224.ms_in1k':
        target_layers = [model.layers[-1].blocks[-1].norm2]
        cam = GradCAM(model=wrapped_model, target_layers=target_layers, reshape_transform=reshape_transform)

    mask = cam(input_tensor=image, targets=None)

    masks = masks + mask
    hit_count += 1
    pbar.update(1)
Results
This GradCAM algorithm is still under review and can be seen on our project github page. The results will still be processed for the paper, and were not run on the specific conditions that the models were also trained. Also, the results were only acquired using a resnet50 as the backbone for the model, so we are not sure if everything is correct or the results are the best ones possible, for the paper techniques we developed.
Though, I still wanted to show something on this post. The following result was produced after the training of MetaOptNet, that got 71% total accuracy. We have chosen BRSet img06628.jpg to test, an image that has the Hemorrhage classification, a class that the model was not presented to during training. It is also important to emphasize that all images ran on the model were also resized from their original shapes to 228x228x3 dimension.
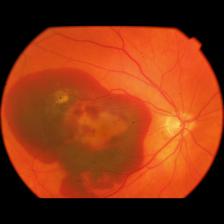
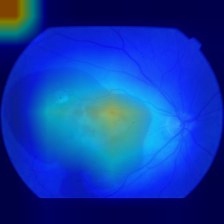
On the given images, we can analyze that the results do not seem to be so good. There is a huge activation spot on the top left part of the image, which we realized that happens for most images, stronger on some of them. This is still going to be analyzed on code review, but the hemorrhage part, on the opposite side of the optic disc, seems to be also generating some activations, and this is the most important part for classification. With that, we know that the features needed to be seen are also being important for classification purposes.
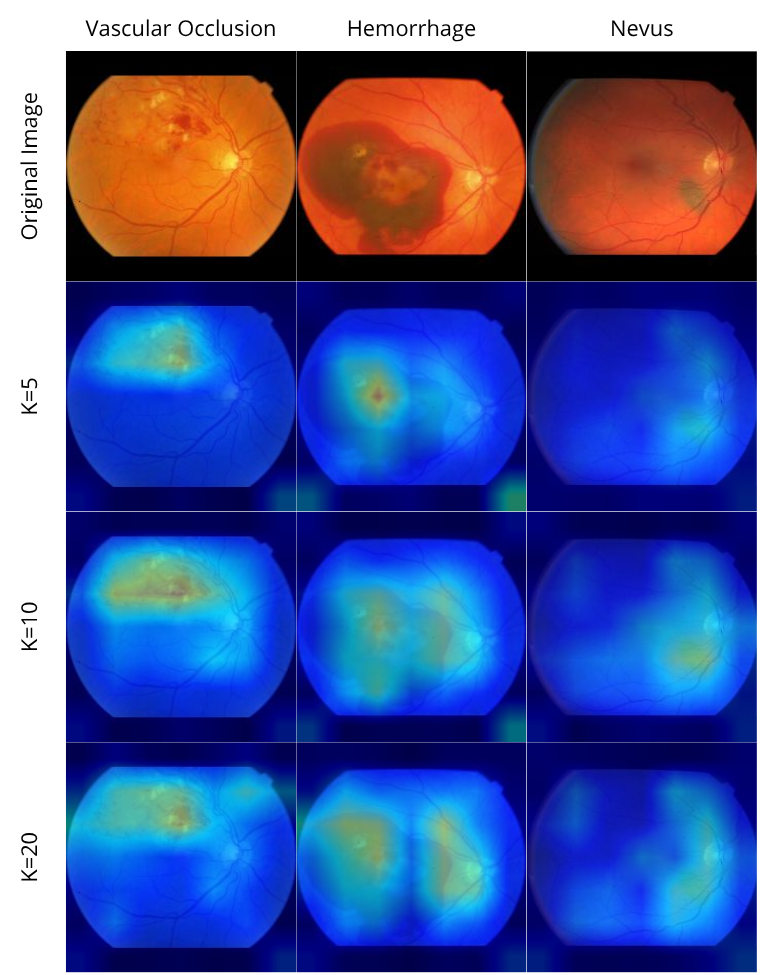
Updates on the results
After a lot of testing, we have partially fixed the huge activation happening for the ResNet50 backbone, on the top-left corner. All it took was adding the target class on the GradCAM generation, and the problem did not seem to be happening anymore. Though, after analyzing it on lots of images, it did happen still when generating GradCAM for a 2-way 20-shot task, everytime. Curiously, it does not happen to the same neural network, when using Swin, a transformer based architecture as the backbone. The results for swin follow:
 GradCAM results on Swin
Knowing that, we have decided to just leave the swin analysis on the paper, even because that helps us save some space to write about other experiments made. Also, we have applied GradCAM to about 78 test images and selected the best results to display.
Also, since the integration with pytorch-grad-cam was not straightforward to the other model architectures, due to several issues of which we had to fix one by one, we have only applied GradCAM to MetaOptNet.
Next monday, june 23rd, we will be submitting this paper to SibGRAPI, a conference on Computer Vision, that will take place in Salvador, Bahia. Hopefully, the overall results presented on our paper will be enough to get accepted.
This post is used as a research checkpoint for the retinal fundus disease classification, supervised by professor Nina S. T. Hirata, from the Institute of Mathematics and Statistics at the University of São Paulo (IME USP).